Kamis, 01 Desember 2016

Hallooww IT-Clubbers,

Saatnya ambil nilai...

Silahkan kirim File/Foto/Video dari hasil karya kalian untuk dijadikan nilai pelengkap UAS 2016/2017 Semester 1. Caranya masukkan aja ke bagian komentar ya... Selamat bekerja n trims u yg udah ngirim.

Kerjakan sesuai bidang Kalian dalam waktu 55-60 menit. Gunakan 20 menit setelah itu untuk mengirim hasilnya ke bagian komentar di bawah ini. (jadi total waktu Kalian 80 menit ya)

Pertimbangkan waktuya, jangan buat karya yg terlalu butuh waktu lama.

Good luck.
Mr.T
=================
Tips.

Langkah menambahkan 'sesuatu' pada komentar Kalian
Berikut adalah cara menuliskannya / format penulisan pada komentar Kalian.

Memasukan/Menambahkan File u Didownload
<a href="Tulis URL File di sini"Kata-kata download di sini atau apa saja </a>

Memasukan/Menambahkan Gambar
<i rel="image">Tulis URL gambar di sini</i>, atau
[img]Tulis URL gambar di sini[/img]

Memasukan/Menambahkan Video Youtube
<i rel="youtube">Tulis URL Video Youtube di sini</i>, atau
[youtube]Tulis URL Video Youtube di sini[/youtube]

Menulis Tag <code>
<i rel="code">Tulis kode yang sudah diparse di sini</i>, atau
[code]Tulis kode yang sudah diparse di sini[/code]

Menulis Tag <pre>
<i rel="pre">Tulis kode yang sudah diparse di sini</i>, atau
[pre]Tulis kode yang sudah diparse di sini[/pre]

Menulis Catatan (Blockquote)
<b rel="quote">Tulis catatan di sini</b>, atau
[quote]Tulis catatan di sini[/quote], atau
[blockquote]Tulis catatan di sini[/blockquote]

Senin, 09 November 2015

Create a blog

To start a blog with Blogger, visit the Blogger homepage, enter your username and password, and click Sign in. Enter a display name and accept Blogger's Terms of Service. Then click the Create a Blog link and get started!
Remember that you have to own a gmail account to sign-up a Blogger account.
Pick an address (URL) and a blog title. Then, choose your favorite blog template (this is how your blog will look when you publish it). Now get creative, add information to your personal profile, and customize how your blog looks, if you feel up to it. Start blogging now!

Dashboard


Your Dashboard, as always, is your starting point. This is where all your blogs are listed, and you can click on the icons next to them to perform various actions on each blog, such as:
  • Writing a new post: Just click on the orange Pencil icon on your Dashboard to access the Post Editor.
  • Viewing your posts: The gray Post List icon will take you to a list of your published and drafted posts for a specific blog.
  • Catching up on your favorite blogs: Below the list of your own blogs, you’ll see a list of the blogs you follow with an excerpt from their latest posts.
  • Everything else: Check out the drop-down menu next to the Post List icon for a quick link to:
    • Overview
    • Posts
    • Pages
    • Comments
    • Stats
    • Earnings
    • Layout
    • Template
    • Settings
Note that the Earnings tab will only show if AdSense supports your language.

Overview

Overview
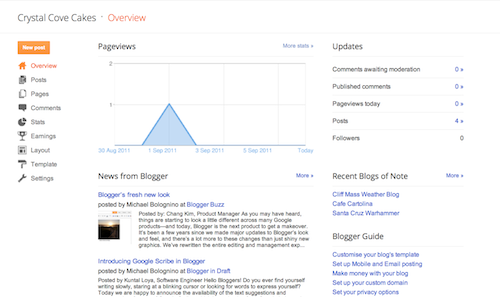
On the Overview tab, you can see your blog’s activity, news and tips from the Blogger team, and recent Blogs of Note.

Write your post


Once you've signed in to Blogger, you'll see your dashboard with your list of blogs. Here's what you need to do:
  1. Click the orange pencil icon to write a new post, and enter anything you want to share with the world.
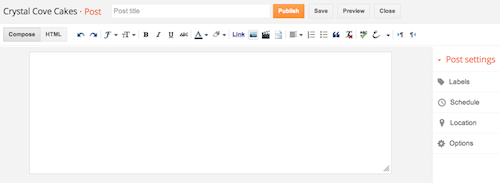
  2. Next, you'll see the Post Editor page. Start by giving your post a title (optional), then enter the post itself:
    New post
  3. When you're done, click the Preview button at the top to make sure it's ready to go, and then click the Publish button to publish your post.

Add an image

You can add an image from your computer or the Web to your blog. Click the image icon in the Post Editor toolbar. A window appears prompting you to browse for an image file on your computer, or enter the URL of an image on the Web.
Once you've selected your image, you can then choose a layout to determine how your image will appear in your post:
  • The 'Left', 'Center', and 'Right' options allow you to customize the way your blog text will flow around your image.
  • The 'Image size' options will determine how large the image will appear within your post.
Click UPLOAD IMAGES to add your image, and then click DONE when the notification window appears telling you that 'Your image has been added.' Blogger will then return you to the post editor, where you'll see your image ready to be published to your blog.
You can also publish images to your blog using your mobile device, Google's free photo software Picasa, or a third-party service like flickr.

Add a video

To add a video to your blog post, click the film strip icon in the Post Editor toolbar above where you compose your blog text. A window appears prompting you to 'Add a video to your blog post.'
Click Browse to select the video file from your computer that you'd like to upload. Note that Blogger accepts AVI, MPEG, QuickTime, Real and Windows Media files and that your video must be less than 100MB in size.
Before uploading your video, add a title in the 'Video Title' box and agree to the Terms and Conditions (you'll only have to do this the first time that you upload a video with Blogger). Then click UPLOAD VIDEO.
While your video uploads, you'll see a placeholder in the post editor showing where your video will appear. You'll also see a status message below the post editor letting you know that your upload is in progress. Depending on the size of your video, this usually takes about five minutes. When it is complete, your video will appear in the post editor.

Customize

Your template is a fun way to customize your blog. When creating a new blog, you're first asked to choose a default template, this is the basic design of your blog. You can choose from many templates for your blog; simply pick the one that best fits your needs.
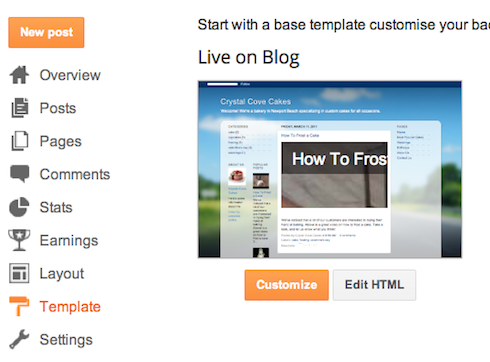
Template"
Once on the Template tab, you can either click on the orange Customize button to get started with our easy-to-use WYSIWYG (“What you see is what you get”) template designer, or choose one of our many default templates. If you’d like to edit the HTML of your blog, just click the gray Edit HTML button.
In addition, you can customize your blog's design using our intuitive drag-and-drop interface. You can also add powerful gadgets such as slideshows, user polls, or even AdSense ads. If you want more precise control over your blog's layout, you can also use the Edit HTML feature. To edit your blog's layout, follow these steps:


  1. Click Layout from the drop-down menu on your dashboard below the blog you would like to customize.
  2. From there, click Edit to edit existing gadgets, or Add a Gadget to add new ones.
  3. To add a new gadget after you've clicked Add a Gadget, simply click the plus sign next to your desired gadget. You can choose from gadgets by category, or search for a specific gadget in the top right of the pop-up window.
add_gadget
Once you've added the necessary information to your selected gadget, click the orange Save arrangement button. Your layout changes will appear instantly.

Privacy and permissions

By default, your blog is completely public, and can be read by anyone on the internet. However, if you want to keep it private, you can do that, too. You can change these settings on the Settings | Basic tab.
Permissions and Privacy
  1. Under the 'Blog Readers' section, you'll probably see 'Anybody' selected as the default. When you change this to 'Only these readers,' you'll get an Add Readers button.
  2. Click the Add Readers button and then enter the email address of a person to whom you'd like to grant access to your blog. To add multiple people, separate their addresses with commas.
  3. For each address entered, the Google Account associated with that address will be given access to view your blog. If an address is not associated with an account, that person will receive an invitation email with a link allowing them do one of three things:
    • Sign in to an existing account.
    • Create a new account.
    •  
    • You can also watch this simple tutorial video for alternative reference.

    •  Download the video

Minggu, 01 November 2015

SketchUp has a number of keyboard shortcuts configured by default. You can also add your own, custom keyboard shortcuts by going to Window -> Preferences -> Shortcuts. Below are some of my most frequently used keyboard shortcuts. By tapping the designated key, you’ll activate that tool without having to select it from a menu or toolbar.
  • Spacebar – Select tool
  • R – Rectangle tool
  • L – Line tool
  • M – Move tool
  • P – Push/pull tool
  • S – Scale tool
  • Q – Rotate tool (This is one with a weird letter. But I remember it because the letter Q is round, and has a “handle” on it. So you could grab the handle and rotate it around ðŸ˜‰ )
  • E – Eraser tool
  • G – Make Component (See below, I created a custom shortcut SHIFT + G to make group)
  • Arrow keys – Lock axis


If you’d like to see a guide to all the built-in SketchUp keyboard shortcuts, sign up for my email listand you can download it for free.

Custom Keyboard Shortcuts

In addition to the default keyboard shortcuts that I use, I have found the need over the years to add a few additional custom keyboard shortcuts as well. You can add your own custom keyboard shortcuts, or, if you like the one I use, you can download my keyboard shortcuts and import them right into SketchUp. (Download link at end of tutorial.)
To add a custom shortcut, go to Window -> Preferences -> Shortcuts. Then, select the command you’d like to create a shortcut to. Where it says “Add Shortcut”, click in the text box then tap the key combination (or single letter) you want to use for the shortcut. Click the plus sign, and you’re done. shortcuts

Controlling what you see at any given moment

X = Hide Rest of Model

One of the ways I’m able to increase my speed, and reduce frustration, is to have control over what objects I see in my model. SketchUp has a great feature built in called Hide Rest of Model, and what that does is it hides anything outside of the current groups or component that you’re editing.
To be able to toggle back and forth between this is super helpful, so I’ve assigned it to the letter X.

N = Hide Selected

J = Unhide Last

Hide selectedI’ve also found it useful to be able to temporarily hide selected faces, and quickly unhide them. For instance, when creating a model for 3D printing, it needs to be solid. If you have any extra faces or edges “inside” the model, they need to be deleted. Sometimes you can locate these extra entities by switching to Xray mode, but it tends to be a bit overwhelming when you can see all the edges in your model.
By temporarily hiding a face, I can quickly identify what needs to be deleted, then I can unhide the face when I’m done.
I use the letter N to hide selected, and the letter J to unhide last. This is silly, but the way I remember the shortcuts is N stands for “NO! I don’t want to see this object right now.” And J stands for “Just Joking… You can be visible now…” It also helps that the letters are right next to each other.

CTRL + D = Hide Dialogs (toggle)

One of the things I love about having dual monitors is that I can place all the popup windows in one screen, and have a full workspace in the other. But sometimes I have everything in one screen if I need to have the other monitor occupied by a PDF, or something.
SketchUp has a built-in command that hides all open windows temporarily. If things are getting cluttered and I need to be able to see my model, I just hit CTRL D to hide all the windows, and when I need the windows back, I hit CTRL D once again.

Creating groups

SHIFT + G = Create group from selected

One of the most common things you do in SketchUp is turn things into groups and components. SketchUp already has the letter G assigned to make a component from the selected entities, so it only seemed right to create a custom shortcut using SHIFT + G to make a group.

Paste in Place

SHIFT + V = Paste in Place

Paste in place is a really useful action built into SketchUp, that is not very well known. To understand what Paste in Place does, you first need to understand groups and components.
Paste in Place allows you to copy or cut an object from one group/component, and paste it into another without moving it from its physical location. When you Paste in Place, the copy will appear at the same exact coordinates and orientation as the original.
This is really useful for when you are reviewing the organization of your model, and need to move things from one group/component to another.


Download my Keyboard Shortcuts
If you’d like to download these keyboard shortcuts, you can download them below
Once you’ve downloaded them, go to Window -> Preferences -> Shortcuts, and click Import. Select the shortcuts file you downloaded and click ok. Just be aware that that importing these shortcuts will override any custom shortcuts you already have, so you might want to backup yours just in case.
Thanks to Matt Donnely for this notes.

Jumat, 16 Oktober 2015

Advanced search operators are query words or symbols that perform special actions in Gmail search. These operators allow you to find what you're looking for quickly and accurately. They can also be used to set up filters so you can organize your inbox automatically. Some of the most useful operators are listed below.
You can also refine your search by clicking the arrow in the search box.

OperatorDefinitionExamples
from:Used to specify the senderExample: from:amy
Meaning: Messages from Amy
to:Used to specify a recipientExample: to:david
Meaning: All messages that were sent to David (by you or someone else)
subject:Search for words in the subject lineExample: subject:dinner
Meaning: Messages that have the word "dinner" in the subject
ORSearch for messages matching term A or term B*
*OR must be in all caps
Example: from:amy OR from:david
Meaning: Messages from Amy or from David
-
(hyphen)
Used to exclude messages from your searchExample: dinner -movie
Meaning: Messages that contain the word "dinner" but do not contain the word "movie"
label:Search for messages by labelExample: from:amy label:friends
Meaning: Messages from Amy that have the label "friends"
Example: from:david label:my-family
Meaning: Messages from David that have the label "My Family"
has:attachmentSearch for messages with an attachmentExample: from:david has:attachment
Meaning: Messages from David that have an attachment
list:Search for messages on mailing listsExample: list:info@example.com
Meaning: Messages with the words info@example.com in the headers, sent to or from this list
filename:Search for an attachment by name or typeExample: filename:physicshomework.txt
Meaning: Messages with an attachment named "physicshomework.txt"
Example: label:work filename:pdf
Meaning: Messages labeled "work" that also have a PDF file as an attachment
" "(quotes)Used to search for an exact phrase*
*Capitalization isn't taken into consideration
Example: "i'm feeling lucky"
Meaning: Messages containing the phrase "i'm feeling lucky" or "I'm feeling lucky"
Example: subject:"dinner and a movie"
Meaning: Messages containing the phrase "dinner and a movie" in the subject
( )Used to group words
Used to specify terms that shouldn't be excluded
Example: from:amy (dinner OR movie)
Meaning: Messages from Amy that contain either the word "dinner" or the word "movie"
Example: subject:(dinner movie)
Meaning: Messages in which the subject contains both the word "dinner" and the word "movie"
in:anywhereSearch for messages anywhere in Gmail*
*Messages in Spam and Trashare excluded from searches by default
Example: in:anywhere movie 
Meaning: Messages in All MailSpam, andTrash that contain the word "movie"
in:inbox
in:trash
in:spam
Search for messages in Inbox,Trash, or SpamExample: in:trash from:amy
Meaning: Messages from Amy that are inTrash
is:important
label:important
Search within messages thatPriority Inbox considers important.Example: is:important from:janet
Meaning: Messages from Janet that were marked as important by Priority Inbox
is:starred
is:unread
is:read
Search for messages that are starred, unread, or readExample: is:read is:starred from:David
Meaning: Messages from David that have been read and are marked with a star
has:yellow-star
has:red-star
has:orange-star
has:green-star
has:blue-star
has:purple-star
has:red-bang
has:orange-guillemet
has:yellow-bang
has:green-check
has:blue-info
has:purple-question
Search for messages with a particular starExample: has:purple-star from:David
Meaning: Messages from David that are marked with a purple star
cc:
bcc:
Used to specify recipients in thecc: or bcc: fields*
*Search on bcc: cannot retrieve messages on which you were blind carbon copied
Example: cc:david 
Meaning: Messages that were cc-ed to David
after:
before:
older:
newer:
Search for messages sent or received during a certain period of time
(using the date format yyyy/mm/dd)
Example: after:2004/04/16 before:2004/04/18 
Meaning: Messages sent between April 16, 2004 and April 18, 2004.*
*More precisely: Messages sent after 12:00 AM (or 00:00) April 16, 2004 and before April 18, 2004.
older_than
newer_than
Similar to older and newer, but allows relative dates using dm, and y for daymonth, and yearExample: newer_than:2d
Meaning: Finds messages sent within the last two days.
is:chatSearch for chat messagesExample: is:chat monkey
Meaning: Any chat message including the word "monkey."
deliveredto:Search for messages within a particular email address in the Delivered-To line of the message headerExample: deliveredto:username@gmail.com
Meaning: Any message with username@gmail.com in the Delivered-To: field of the message header (which can help you find messages forwarded from another account or ones sent to an alias).
circle:Search for messages that were sent from someone who you added to a particular Google+ circleExample: circle:friends
Meaning: Any message that was sent by a person in your "Friends" circle.

Examples: circle:"soccer friends (team blue)" or circle:"my \"fab four\""
Notes: For circle names that include a space, parentheses, curly brackets, or vertical bar, add quotes around the name. For names that include quotes, add a back slash immediately before the quotes.
has:circleSearch for all messages that were sent from someone who you added to your Google+ circlesExample: has:circle 
Meaning: Any message that was sent by a person in any of your circles.
category:Search for messages within a categoryExample: category:updates
Meaning: All messages in the Updates category.

Example: category:social Mindy
Meaning: Messages in the Social category that include “Mindy.”
size:Search for messages larger than the specified size in bytesExample: size:1000000 
Meaning: All messages larger than 1MB (1,000,000 bytes) in size.
larger:
smaller:
Similar to size: but allows abbreviations for numbersExample: larger:10M 
Meaning: All messages of at least 10M bytes (10,000,000 bytes) in size.
+
(plus sign)
Match the search term exactlyExample: +unicorn 
Meaning: Finds messages containing “unicorn” but not “unicorns” or “unciorn”
rfc822msgid:Find a message by the message-id headerExample:rfc822msgid:200503292@example.com
Meaning: Locates the exact message with the specified SMTP message-id. Learn more about headers.
has:userlabels
has:nouserlabels
Search for messages that have and have not had labels that you created applied to them.
NOTE: Gmail applies labels to individual messages, not to conversation threads.
Example: has:nouserlabels
Meaning: Finds all messages without any of your own labels (excludes automatic labels like inbox, spam, and trash). Since Gmail applies labels to individual messages, you might see results that appear to have labels; in this case, another message in the same conversation thread has had a label applied to it.

Boolean operators

You can use boolean operators such as 'OR' when searching in Gmail.
For example, to look for messages from username@gmail.com and messages that contain the subject line 'Meeting reminder', you can enter 'username@gmail.com OR meeting reminder' in your Gmail search box.
Using these along with Gmail's advanced operators can be a great way of making your search criteria more powerful.
The 'or' function in Gmail is represented by 'OR,' and the 'not' function is represented by a minus (-). You also can use quotes (" ") to specify an exact phrase.

Translate

Recent Posts

Popular Posts